
9/13.01.2018
Задние жёсткие трубы вилки (временно) зафиксированы, это нужно для того чтобы сравнить с моей другой springer fork на соответствие всем размерам. А позже приложить к мотоциклу для дальнейшей работы.
Rear (rigid) fork legs (temporary) are fixed, this needs to compare with my other springer fork for compliance to all dimensions. And later to attach to the bike for further work.
Rear (rigid) fork legs (temporary) are fixed, this needs to compare with my other springer fork for compliance to all dimensions. And later to attach to the bike for further work.


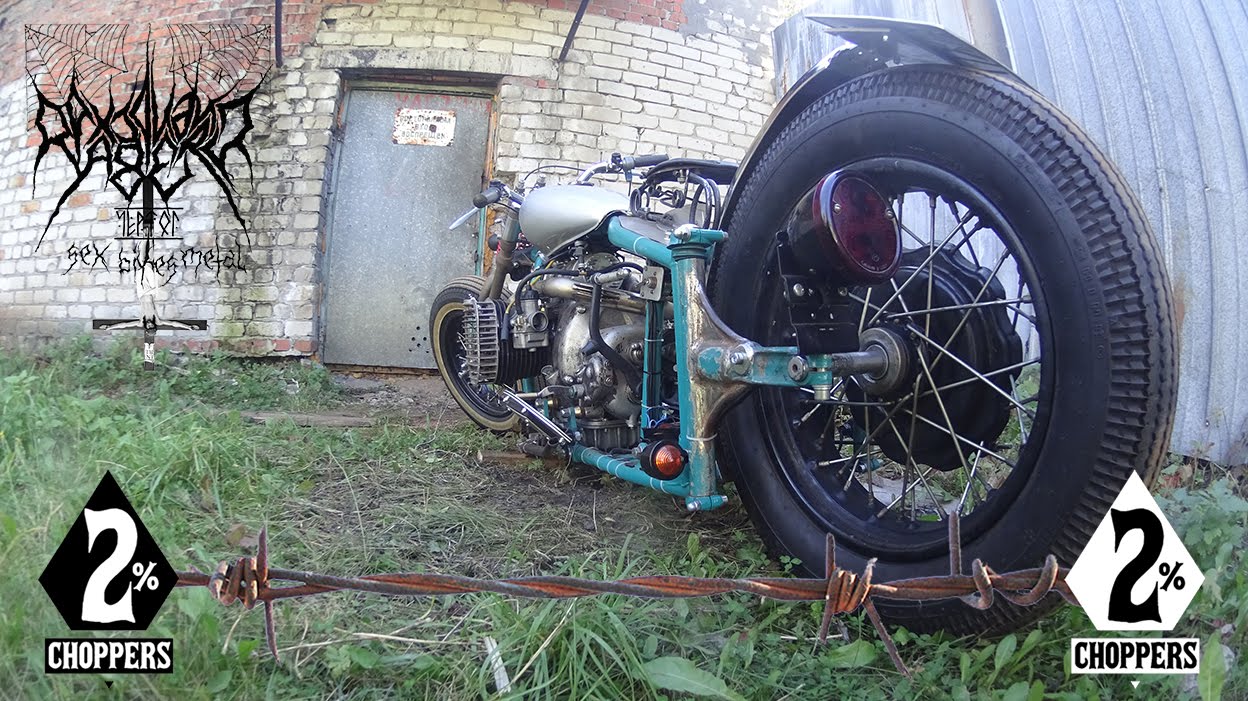
Временно закрепил Задние жёсткие трубы вилки на том месте где они должны быть. Можно увидеть примерный силуэт мотоцикла и прикинуть на каких местах должны быть остальные элементы конструкции.
Temporarily cemented Rear (rigid) fork legs where they should be. You can see a rough silhouette of the motorcycle and figure out what places should be other elements of the design.
Temporarily cemented Rear (rigid) fork legs where they should be. You can see a rough silhouette of the motorcycle and figure out what places should be other elements of the design.


Приступим к нижней траверсе. На основе оригинальной HD WLA Springers замерим все размеры но с необходимыми корректировками. Они необходимы так как есть различия в размерах рулевой колонки моего мотоцикла, сделанных мной задних жёстких труб вилки, в небольших отличиях размеров используемых мной материалов.
Proceed to the Bottom tree. Based on the original HD Springers WLA let's measure all the dimensions but with the necessary adjustments. They are necessary because there are differences in the sizes of the steering neck of my old bike made me Rear (rigid) fork legs, small differences in the sizes of the materials.
Proceed to the Bottom tree. Based on the original HD Springers WLA let's measure all the dimensions but with the necessary adjustments. They are necessary because there are differences in the sizes of the steering neck of my old bike made me Rear (rigid) fork legs, small differences in the sizes of the materials.


В стандартной Bottom tree HD Springer, steering stem расположена по центру. В моём случаи steering stem необходимо сместить немного назад в сторону двигателя. Зачем это нужно ведь не проще ли сразу сделать steering neck под необходимым углом? Дело в том что когда я изготавливал раму мотоцикла (около шести лет назад) и соответственно выставлял угол steering neck то дела это под имеющуюся тогда у меня первую springer fork. Но а сейчас переделывать steering neck очень трудоёмкий процесс. На рисунке выше отмечены: черным кругом - стандартное (по центру) расположение steering stem. Красным кругом - необходимое мне расположение.Иногда мне кажется что я сначала создаю себе проблему чтобы бы позже мучиться над её решением?!
In the standard Bottom tree HD Springer, the steering stem is centered. In my cases the steering stem needs to be shifted slightly back towards the engine. Why do it it is not easier at once to make the steering neck at the required angle? The fact is that when I make the frame of the bike (about six years ago) and therefore exhibited the angle of the steering neck that the case is under existing I first springer fork. But now remaking steering neck is a very time consuming process. In the figure above, marked: black circle - standard (center) location steering stem. Red circle - I need a location. Sometimes I think that I first create a problem that would later agonize over her decision?!


Был изготовлен временный шаблон из картона для дальнейшего моделирования.
A temporary cardboard template was made for further modeling.

Так же моя нижняя траверса имеет отличия и по высоте относительно крайней верхней и нижней точек (фото ниже).
Also my bottom tree has differences in height relative to the extreme top and bottom points (photo below).

Закрепив (временно) шаблон bottom tree появилась возможность увидеть какой необходимо сделать эту деталь в металле, где она должна быть закреплена относительно других элементов springer fork (в данном случае указывать размеры не имеет смысла так как они корректируются в зависимость от вашего желания и от того с какие размеры у вашей steering neck). В моём случае я удлинил нижнюю траверсу где-то на два сантиметра.
Having fixed (temporarily) the bottom tree template there was an opportunity to see what it is necessary to make this detail in metal where it has to be fixed concerning other elements of springer fork (in this case it makes no sense to specify the sizes as they are corrected depending on your desire and with what sizes at your steering neck). In my case, I extended the bottom tree by about two centimeters.


И наконец когда все необходимые замеры были сделаны, на их основе а также используя шаблон можно приступать к изготовлению нижней траверсы. В качестве материала я использовал сталь (к сожалению не знаю марку стали) толщиной 5 миллиметров, что соответствует толщине двух основных bottom tree HD Springer fork.
Finally, when all the necessary measurements have been made, based on them and using the template you can proceed to the production of bottom tree. As a material, I used steel (unfortunately I do not know the brand of steel) 5 mm thick, which corresponds to the thickness of the two main bottom tree HD Springer fork.


А далее происходит обычная рутинная работа, придаём стальному куску прямоугольника необходимую форму с помощью угловой шлифовальной машины.
And then there is a usual routine work, we give a steel piece of a rectangle the necessary form by means of a corner grinding machine.


Основная форма сделана, теперь необходимо вырезать два отверстия под Задние жёсткие трубы вилки. Делать я это буду исходя из имеющихся у меня инструментов. Это Дрель и машина для гравировки, бор фрезы и старые добрые напильники (ручной труд на все 100%!). Разметим будущие места отверстий. Потом дрелью просверливаем отверстия по контуру.
The main form is made, now you need to cut two holes for Rear (rigid) fork legs. To do I'm going based on my existing tools. This is a Drill and engraving machine, drill cutters and good old rasp (manual labor is 100%!). Letís trace out the General future location holes. Then drill drill holes along the contour.


Последняя стадия - это корректировка отверстий с помощью бор фрез и напильников до получения ровных отверстий.
The last stage is the adjustment of the holes with the help of cutters and rasp to obtain smooth holes.


Глаза боятся а руки делают! Впереди продолжение работы...
The eyes are afraid but hands do! Ahead continuation of work...


